Sunday, March 27, 2005

Kitchen Inspiration- a look back...

We did alot of planning and research before undertaking this project. We snatched up every magazine with period kitchens that we could get our hands on and thought about what we could afford and what was most important to us. I started to notice quite a few period-style kitchens used shelving rather than upper cabinets. This appealed to us because we didn't really like the boxed-in look of upper and lower cabinets. Also, we have a walk-in pantry and didn't feel the need for all that additional storage. It also has the added bonus of making
the room seem more spacious.

Shelving Ideas


Bracket ideas

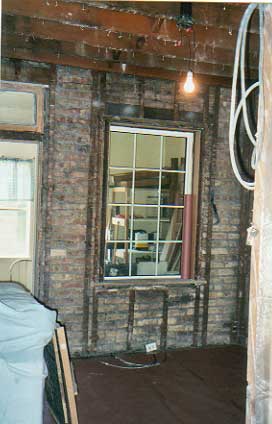
Flooring ideas: We almost went with the checkerboard look on our floor using commercial grade VCT, but when we removed the 3 layers of old tile, we found we had almost pristine maple floors. We couldn't bear ruining them by installing a plywood subfloor over them and instead sanded them and finished them ourselves. I do think the checkerboard is a nice look though.

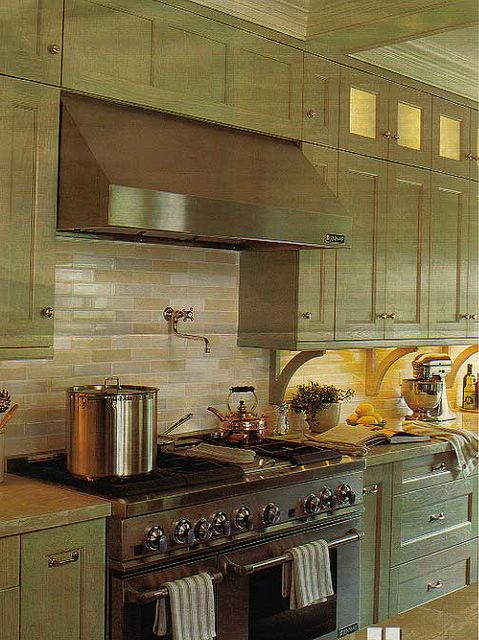
Subway Tile and Exhaust Fan ideas: We are using Cobsa Wave bone subway tiles for our backsplash with a few Motawi art tiles as accents. We also went with a wall-mounted exhaust fan like in this picture since an overhead exhaust vent would not look right with no upper cabinets.

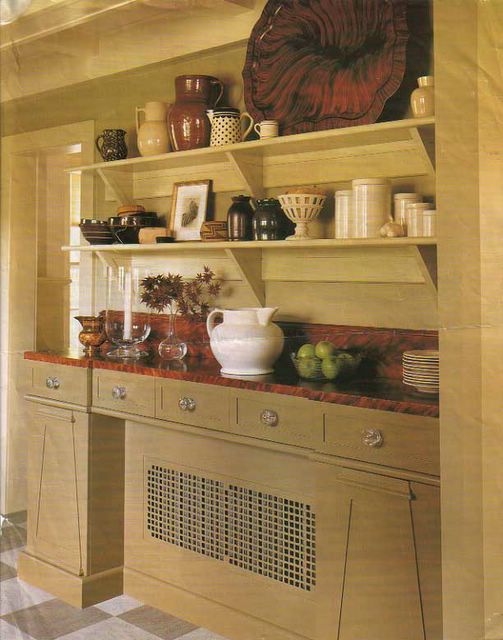
This was the first picture I saw that gave me the shelving idea. Thank Martha Stewart I guess- it was in her magazine. The idea was presented as a way to save money, but it really depends upon what you make your shelves out of. This approach would only save you money, if you used inexpensive wood or particleboard shelving (God forbid!). We will be using oak for the brackets and shelving to match the beadboard and existing moldings.

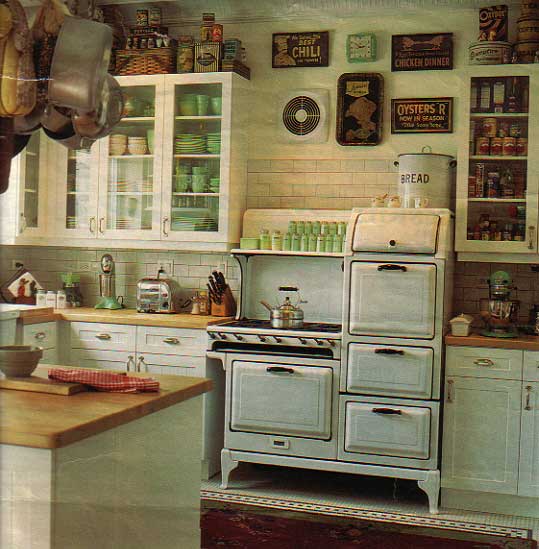
more kitchen shelving options

Good magazines we used: Renovation Style, Kitchens & Bath Ideas/Fine Homebuilding Magazine, American Bungalow, Old House Journal, This Old House, House Beautiful.

Saturday, March 26, 2005

DIY: Farm Sink & Formica

We would have loved to put soapstone countertops in our new kitchen. We think that would be more period than the formica we are using, but we just couldn't afford the soapstone with all the other expenses.

I held on for a while, and then I gave in to formica telling myself we could change it in a few years. Also not in the budget, custom cabinetry. We went for mid-line Kraftmaid cabinets from Home Depot with some upgrades including: an Amber Glaze, dovetail drawers, plywood sides, and heavy duty drawer glides with a self-closing mechanism.

Anyway, today we made the template for the countertop, which Steve will fabricate at the local woodshop next week. But it's tricky because we selected a Farm Sink.

The farm sink can't be undermounted with a formica countertop because of the potential for water to penetrate the MDF particleboard and then it will fail. So, we are overmounting the sink, that is the sink will be raised by about 1/2" above the countertop. Farm sinks are installed both ways if you look around.

One of the other issues we have is that the farm sink is wider on top than at the bottom, so to make an accurate template that will fit tightly around the sink, we have to elevate the template with 2x4s to get it to the correct countertop height and therefore the correct dimensions. It's complicated, we know, believe me!

The soapstone would have cost us more money, but we would have had it fabricated elsewhere and installed by someone else. This formica is expensive in time and thinking-wise, mostly because of the farm sink. On a positive note, we love farm sinks and we were able to find a fire clay one, which is stronger than porcelain that was under $400, which is really a bargain. We got it at Community Home Supply The company that made it, Barclays , is from Argentina and sells direct to distributors, which our salesperson said explained the difference in price. We found most other farm sinks to be at least $700 and up.

So, really the fact that we chose a farm sink and then formica for our countertop has made countertop process much more exacting and demands precise measurements. Usually with a countertop there is a little fudge factor, especially when you do an overmounted sink. But, the end result is we will have a more custom look and a more period effect and we will have accomplished this for much less money than is typical. In a few weeks we'll have some photos of the finished job posted.

Wednesday, March 23, 2005

One Year anniversary

Last year, Easter weekend, we demoed the kitchen. I really can't believe it's been a whole year. I think I've already said that we are at the countertop point, then backsplash tile, then running water, so we are pretty darn close, but then our pantry shelving is not even started yet.

If anyone else has taken this long to do a room project and cares to share, I'd love to hear from you. It's hard for me right now because there is very little I can actually do. Steve does the carpentry work. I will be tiling when the time comes, but for now I am on a respite, which I find uncomfortable. We can't really start anything else until this kitchen monster is done. I never thought I'd say it, but I can't wait to strip another door! It's just been kitchen kitchen kitchen for way too long!

And speaking of waiting, I was on jury duty today and sat in a room with over 100 other people sitting around waiting to be dismissed- what a waste for a busy do-er such as myself-I actually slept like I was on an airplane.

Sunday, March 20, 2005

Bathroom Before & After

Unfortunately I didn't take photos before the demolition. Suffice it to say, the tiles were falling off the walls, the shower had zero water pressure, our sink only had cold water, and there was no electricity. We actually had an extension cord running into our kitchen for the light!

We did everything ourselves in this room except the run new water lines and refinish the tub. We used Magic Touch Refinishing and would never use them again. The only kind of "magic" they worked was that the tub magically started to crack after one month. We tried for months to get them to come back and fix it to no avail. We will probably need to have it redone at some point.

Our bathroom is small and typical of turn of the century homes. Because of this, we opted for a pedestal sink, rather than a vanity cabinet, which would make the room seem smaller. We also hunted down the narrowest toilet and pedestal sink we could find. The toilet is made by Toto. If you go their site, check out the "SoftClose" toilet lid. It has a piston, so it lowers gradually instead of slamming. It makes for a more peaceful house-no angry toilet lid slamming here!

Beacause of the small space we selected a predominantly white color scheme. At the time, we were not aware of all the options for period tiles, so we used standard 4x4 tile, but we went for a classic look with the black trim and white tiles.

Steve made the medicine cabinet (seen above)out of teak. Because we have a double thick wall, about 8" deep, we were able to make a deeper cabinet that holds toilet paper and our blow dryer, and lots of toiletries. It holds much more than a typical vanity cabinet.

Tub area- We put a hotel towel rack at the back end of the tub to hold extra towels because space was tight. Believe it or not, the towels do not get wet when you take a shower. It's not in this photo.

Bathroom was completed in Fall of 2002.

What we have to look forward to...


What we have to look forward to...

After showing all that hard work we did on the kitchen, I had to put up some eye-candy.
Billie and my Dutch Gardens tulips from Holland. Coming soon....

A few pics on the new walls...


Using a drywall sander is highly recommended- gave us a completely professional finish.
The lower wall is white because Beadboard in being installed there-tongue and groove oak.

The back door is poplar we think. It needs to be sanded some more and stained to match the molding we will have in the kitchen.

Also, we had the stained glass window made for the transom- you can't see it too well here though. Also, this photo shows the floors refinished and our Rejuvenation sconce "The Detroit".

Pantry walls done. Floor not sanded yet- has paint on it and possible water damage.

Saturday, March 19, 2005

Soothing Greenboard

After we were done, it was one of those "never again" moments. It took us so long to get the room done. We worked 3 days in a row like 12-14 hours/per day. We were determined to get the walls up! Of course, it's an old house and nothing is square.
I have to say though, that the walls turned out beautifully. You would never know a couple of greenhorns did them.


Framing & insulating finished in July


Framing for the future plate rack to be made by Steve. Insulation by Jocelyn.


Framing for shelving over sink area and for wall-mounted faucet- we opted not to do upper cabinetry- to save money and to keep the kitchen more period looking.

Framing for the exhaust vent and insulating of the brick wall done. Also new electrical wiring done.

Putting the ceiling up with the drywall lift- a Godsend. Us two skinnies never could have done it without it.

Looking back on all this, I feel like saying, "What took us so long?" It seemed to take forever to get all the framing done. We had to put additional framing on and we had to shim the entire room because dry wall is thinner than plaster and we wanted to put back the original oak moldings everywhere. Steve had to make new frames on 2 doorways and all the windows too. And he isn't a carpenter by trade, but he's learning. Plus, during this time I was actually looking for a job too. Oh yes, and stripping woodwork out in the backyard...

Kitchen demolition Easter 2004


It took us a 12 hour work day Good Friday to remove all the plaster. Saturday we finished removing the lathe. We wore respirators and disposable body suits to avoid the dust-wish I could find the pictures of those outfits- we were quite a sight at the end. Next to drywalling, this is the hardest work I have done so far.

Our temporary kitchen sink. After the plumber ran new pipes in June, we were without running water and still are. For a while, we ran a garden hose through the window, so we would at least rinse things, but then we were invaded by ants crawling up the hose. I decided to chuck the whole thing and use the bathroom sink and wash dishes in the basement. Radiator was yanked also. We now have a toe kick heater that runs off our furnace. It's a Myson heater.

The lathe that was removed by me! Note the plastic drop cloths. Use of these on every doorway (both sides) really kept dust to a minimum in the rest of the house.

pile o' debris- but aren't we tidy? We got lucky. There was a teardown next door and they let us dump our debris in their dumpster. We paid someone to haul it out though- there was no way we were moving that stuff again!

Thursday, March 17, 2005


Mojo the dachshund and Billie the cairn terrier Posted by Hello
These two little critters make it all worth while. They are always a comfort and encourage us to take breaks and go out for a walk. These pictures really capture their respective personalities too. Mojo is so serious and Billie is a little scamp.

The Kitchen Before...

I've decided it's time to get those "before" photos up. I will tell you that our kitchen is about 85% done right now. We only need the countertop, backsplash, and custom shelving done (all of which we are doing ourselves) and we will be able to have the plumber come in and turn on the water. To let you know how momentous of on occasion this will be, I must tell you that we have been without running water in our kitchen since June 2004.

During that time, we have been carrying tubs of dishes down to the basement to wash in the laundry tub- tons of fun let me tell you. Nothing like coming home from a hard day at the salt mines to hunch over a tub in a dimly lit basement washing caked food off plates, bowls and pots! We also had the world's biggest work triangle for a while with our work station, microwave and coffee maker in our den, fridge in the dining room, and stove in the kitchen (often covered with drop cloths) Some days are easier than others of course.

Looking at these "before" photos, you can easily see we had a little work to do!
Highlights of the old kitchen:
Duct taped doors on cabinets
Drab green band around the ceiling left over when we removed the drop ceiling with florescent lighting
Industrial vinyl tile
cracking plaster
inconveniently located outlets
no ceiling light- like the spotlight we used for a while?
missing woodwork

This is the longest project we have done so far. We started in Easter last year and will be done soon. Our bathroom took us 9 months and we took a year off major projects after that. Just so you don't think us fools (or maybe this will make you think us fools) we do most everything ourselves except for heavy plumbing and electric. Next post I'll list steps we took thus far and show progressive pics too. It will be so great when it's done- really really great...

Duct taped cabinets!


View towards the dining room and the so-called civilized part of our home


lots of woodwork to strip!


We had the window bricked up and pulled the radiator for much needed counter space.
As you can see we went the way of vinyl clad windows. Much to our regret we couldn't afford wood windows, maybe someday!

Space Planner anyone?


God bless pantries Posted by Hello
The pantry has been gutted and re-drywalled with new lighting and woodwork still to be put in. It will have custom built-in shelving made of oak and built by Steve in his spare time. hahaha.

Making Room for Counter Space


We had the window bricked up and pulled the radiator for much needed counter space.
As you can see we went the way of vinyl clad windows. Much to our regret we couldn't afford wood windows, maybe someday!

Drop Ceiling finally comes down!


lots of woodwork to strip! Posted by Hello
As you can see this room had a drop ceiling with florescent lighting. That explains the green band of color around the ceiling area- that's not mold! All the original base mouldings were removed and a framed doorway was eliminated. We stripped all the woodwork and replaced missing woodwork. Also recreated the doorway that seperated the kitchen from a short hallway that goes right to our bedroom. During this process, I learned what it means to get a buzz off of paint fumes and Strypeeze. I know how to use a heat gun and the Silent Paint Remover. Just ask me about removing paint from wood anytime...

Where's the Doorway?


View towards the dining room and the so-called civilized part of our home Posted by Hello
This picture somewhat shows the missing doorway that we replaced. It also maybe makes you feel a little less sorry for us seeing we have some finished house to live in. Note the ever-present dog gates to keep our small dogs safe away from debris etc...They hate when we work- so boring...

Like our light? Posted by Hello
The ceiling wiring was cloth and gave out so we opted to use our handy work light. Also note the awful position of the outlets on the floor near the dogs water dish-eeeeek! We actually ended up ripping out that brand new window to make a smaller window for a better kitchen layout. There went $600++ down the drain.

Saturday, March 12, 2005

Steve Smiles!


I wanted to post this picture from my sister's wedding rehearsal last September because Steve is smiling big and so am I. He NEVER smiles for pictures, so I just love this. That cutie in the pink is my ever so hip Mom.
Sept. 2004 Posted by Hello

Back to normal

Well, we are back to our normal routine of working on Saturdays. Steve is working on the cabinets, putting the filler strips and toe kicks in and also building the supports for the countertop, which will be tackled next weekend.
I cleaned the house from one end to the other and used my beloved Dyson vacuum that I got for Christmas from my sister and Mom. I know many will think me lame for getting excited about a vacuum, but we NEEDED a good vacuum to clear out all the leftover construction dust and dog hair bunnies that multipy like rabbits here. It makes my house so clean- it now feels like a home and not a workroom anymore.

On a different note, I am glad they solved the Lefkow case but what a waste. I love the image of her husband is his dapper attire bringing a rose and lunch to her office after 20+ years of marriage. I bet it will stay with a lot of people for a while, that image. Those small kinds of gestures are what make a life worthwhile I think. How do you treat others? How to you rise above indignities? That's what I want to aspire to.

Went to see a play last night at Victory Gardens Theater called "Humble Boy." It was quite good, but I am too tired to analyze it right now!

Sunday, March 06, 2005

Glorious Sunday

Today was at least 60 degrees out. It was a day to go outside and start removing layers: hat, gloves, scarf, fleece, etc... Not a wool socks day at all- what a gift!
Today I made like Forest Gump and went running. In my case it was walking. I felt like I wanted to walk until I couldn't walk anymore. I walked up to Andersonville and went into Taste of Heaven and got some treats. Then I went to Alamo and got some new shoes. And finally, I stopped in Famous Fidos and got some treats for my babies. No treats for Steve though- he's on the bad list for not fixing our kitchen.

I feel relaxed now-thankfully. It's going to get cold again tomorrow I heard- but at least everyone will be back at work and won't feel deprived.

The only thing I did to improve our house this weekend, besides put some stuff away, was go out front and pick up the trash that had blown down the street. I now clean about half of our block on a regular basis. I just can't stand looking at all the garbage people carelessly toss outside. If everyone did this- what a world we'd have. So much prettier!

Saturday, March 05, 2005

Time Off


See what happens when I can't work on my house? Above, a rare moment when Steve and Jocelyn put down their hammers and chisels, showered up and drove to Michigan for Christmas. Of course, in this photo my errant tooth (the one that broke off during our drive to MI)was glued precariously in place by over-the-counter tooth cement. Mercifully, it didn't fall out during x-mas dinner. Thank goodness for small favors...

Steve and Jocelyn 2004 Posted by Hello

Sad Saturday

Took my dogs to the park to cheer myself up because Steve can't work on the kitchen today. Major bummer. When me Mojo and Billie went to cross Sheridan Road, I noticed all the traffic lights were out and though it strange. We managed to get across safely and had a nice if not messy walk (melting snow, mud, sand etc...). On the way back I saw an undercover car with lights flashing, followed by a State trooper, followed by a police car and then 3 police motorcycles. I thought, "what the heck is going on here?" And then I remembered, it's Judge Lefkow's husband Michael Lefkow's funeral today. The judge lives on Lakewood, like a mile away from my house- kinda close to home really. Sometimes I think that if there's sadness in the air I am just a magnet for it- just call me static cling for sadness or something.

I do feel sad today. I was feeling okay until Steve said he wasn't working on our kitchen today. Now I am just depressed about that. And even seeing the funeral procession didn't put things in perspective like one would hope. But you know what? At the risk of sounding like Stuart Smalley (remember him? Al Franken, "I'm good enough, smart enough, and doggone it people like me"?), it is okay to be a little sad sometimes...

Anyway, anyone reading, have a great day. We are all lucky to be alive.

The Gates

Just thought I'd post this photo of my Dad at The Gates in Central Park. Personally, I like the whole Gates idea. So whimsical and basic- in a good way. I think it appeals to the child in us in its simplicity yet the scale is quite amazing from the photos I've seen. And isn't the end of February the best time for something like this? A few weeks back, I think it was Monday, Feb. 21st, Katie Couric said on the Today Show that that date was (statistically speaking) the most depressing Monday of the year. So hey, it's all uphill from here on out!


My Dad in Central Park at The Gates Posted by Hello