Monday, September 10, 2007

Sticking Points

It is inevitable that one gets stuck on occasion. Sometimes you are waiting on materials or perhaps you sprain your ankle- things happen.
In this case, we've run into a bit of a problem with our pantry project. Nothing disastrous, but just one of those things that you have to problem-solve.

It started when we decided to put the microwave in the pantry. After all, who wants to look at a microwave in a more period style kitchen? Plus, they are space hogs and only used (by us) to heat up leftovers or Steve's coffee, which he likes super hot.

We had ordered the same brackets that we used for the upstairs pantry from Vandyke's. We liked the design and the price was right. But then we realized that to fit the microwave on our shelving, the shelves would need to be deeper and subsequently the brackets larger. Fortunately Vandyke's takes returns.

To be exact, we need brackets that are 11"- 13" for the shelf support and about 9" for the wall mounted part. Not easy to find as we have found. Or rather, not easy to find in a style we consider appropriate for the style of our home. In fact, I have found a definite shortage of arts and crafts style iron brackets on the market. Most are Victorian in design- you lucky Victorian homeowners!

We found two options during our rather extensive googling. One was an iron bracket in an Eastlake style from goantiques.com. This company says they may get more in October, but they will not give out a phone number- a red flag in my book. Not to mention how difficult it was to get a straight answer via email.

The other is solid brass and twice the price ($40/pair). The more I look, the more appealing these become.

Then, I found these from our friends over at Rejuvenation. They are $29 each and we need 16 of them!

Eastlake is not the most period appropriate for us of course, but for some reason we feel better about that style than more flowery Victorian.


Other than this issue with the brackets, things are moving along with the pantry. Here you see the cabinet grade 3/4" birch plywood we got for a steal at Owl Lumber because it was off size and they wanted to get rid of it. It's a shame to cover it up. In case anyone is wondering, we had to open up the wall to add more 2x4s and decided to add plywood for more support. We also added an outlet for the microwave.

Steve has been faithfully going to the wood shop and gluing up the shelves. They are now ready for me (the helper) to sand and stain them.


The plans are on the wall. This pantry has been planned out in great detail. When it comes to storage in our small home, we do not mess about.
I am very excited to finally have a place for my beloved Dyson vacuum cleaner and to be able to finally unpack the kitchen contents still stored in boxes in the basement.
And that is my way overdue pantry update!

Sunday, August 12, 2007

Some more progress...

We are slowly hacking away at our "to do" list for this summer. We hung the refinished oak door in the den on Saturday. It looks nice, but after we hung it I really had that "I want more!" feeling.

I wanted to rent that jackhammer and tear up decrepit patio or obsolete sidewalk in the front yard that will expand my garden. Or start stripping the basement stairs or something. But unfortunately, I am sick with a miserable summer cold.

I managed to prime the trim around the back porch door and then I called it a day.

Steve wired the additional outlet we are adding in the pantry and put in the blocking for the shelves.
Anyway, this is about all sniffly me can manage in the way of a post today. Pantry post coming soon.


Sunday, August 05, 2007

Awning Photos

I know I've been a bad houseblogger this summer. I have to admit that I've been distracted by my other fixer-upper projects, which have to do with the neighborhood at large and not just what is inside our home.

I am finally getting around to posting photos of the new awnings from Chesterfield Awning. We are very happy with them. Not only do they add curb appeal, but with our rough winters they will give a much longer life to our front door, as well as keep the building cooler with shade.


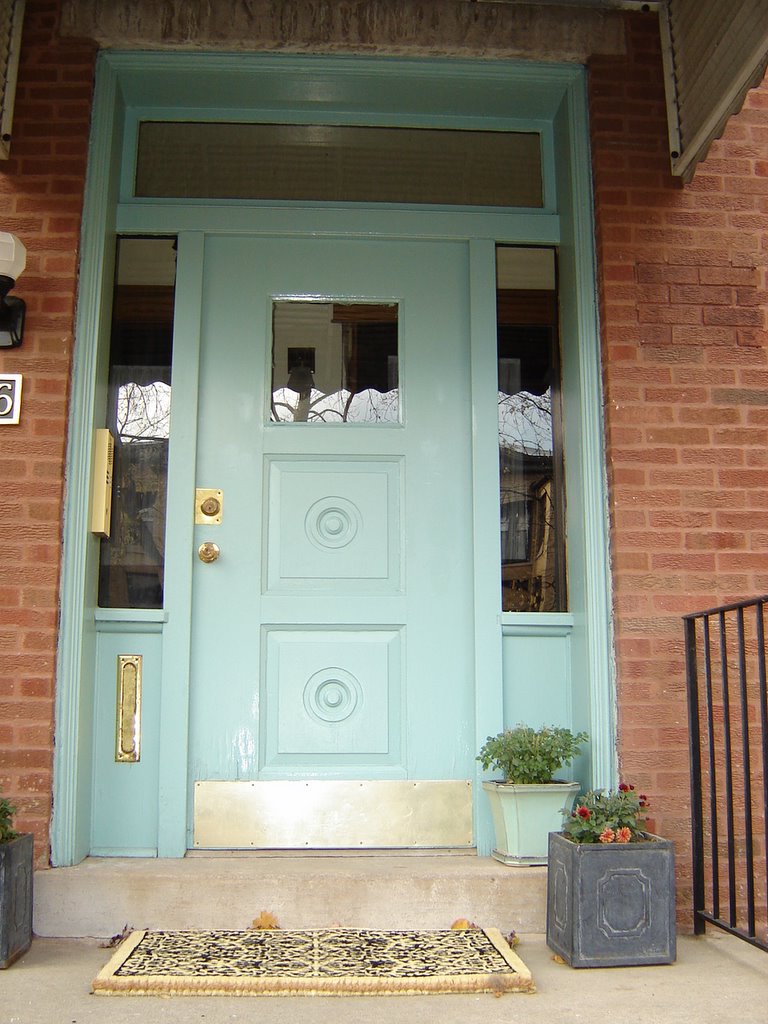
Here you see the finished front door with brass kickplate. It is amazing how fast it is tarnishing.

This will end our curb appeal work for the summer. In the fall, I may be jackhammering a small sidewalk if I have time to expand my garden, but we'll see.
Progress is slow, but we are working on things. We finally got the shoe moulding done in the front entry as you see here.

This weekend I sanded and stained the den door. Steve cut out a wall in the pantry in preparation for blocking. Posts on that soon.

Projects that MUST be done this season:
Pantry
Garage Entry Door
Trimming out & painting back porch door
Scraping & painting trim around garage

So we're here working just at a slower pace.

Thursday, August 02, 2007

The stuff dreams are made of

I realize this post title is quite lofty, but this post is an ode to someone I've never met but whom I admire greatly.

The model planes you see here were made by my Dad's partner Dave's Dad. When Dave was a little boy, his Dad spent hours and hours making these model planes and boats. Not only did he pay attention to every detail, but these creations also actually worked. The airplanes really flew. The boats sailed on water.

Dave told us about how some airplanes his Dad built would crash and then he'd just make another one. He told us how his Dad would take him out to put the boats into a lagoon. I've always loved the image of this. And even though I never got to meet Dave's Dad, I can see just a bit how this kind, patient and very intelligent man came to be with a Dad like his.

Here is the boat. I was just in awe of these when I saw them. These were not kits. These were made from scratch!

But one thing was missing. The boat needed a stand. And that was a job for ...Steve the woodworker...

A small job, but that boat deserved to be on a stand not a pillow.
The stand is almost done. It's made of oak and coated in 4 cans of black spray paint to have a smooth finish. Steve didn't fill the grain, so it took alot of paint to get that perfect surface.

I will post photos when we bring the stand over this Sunday.


Some more photos for the heck of it...

Steve and Dad measuring the template.


The boat with template. Template made out of fome core board and glued together with hot glue gun.

Wednesday, July 18, 2007

The girl is back

Well, not exactly. But I did strip the basement door this past weekend. It's the last door left in the interior of the building that needed to have that unsightly white paint removed.

I am happy to report the door is in pretty much pristine condition and needs no repair.


In case you are interesed, it took 2 hours to strip one side with a heat gun and then one coat of Citris Stripper cleaned the residue off. The other side was just shellaced. We decided to keep for posterity.

Nice wood grain isn't it?

All that remains on the entry is to install the kickplate and then I will post photos.


Thursday, June 14, 2007

Happy Summer!

I know I'm being a sub par houseblogger this summer. I have to admit we've been distracted this year.

After last year, I vowed this would be "the summer of fun," and we are keeping to that promise. Not that house projects are not fun- because they most certainly can be. And sometimes, you need a break.
Here we are at the Silver Lake Dunes in Michigan. We rented 400cc ATVs for a few hours and acted like bad-asses. No, I have never done this before, but it was a blast.

We were in Ludington visiting Steve's family for a week. Here's a shot of Lost Lake, where we spent a quiet afternoon.


It's important to let a dog really be a dog sometimes if you know what I mean.


I promise we'll be back posting about some projects. I need to post the awnings, which are now up and look great. And the pantry is on the horizon.

But in the meantime, everyone make sure and take a little time to swing in that porch swing, have a glass of lemonade, and get a little sunburn on your nose.


Sunday, June 10, 2007

Old House Chores

For those of us living in older homes without cooling systems, this time of year brings the dreaded task of installing the window unit air conditioners. It's not one of my most favorite tasks and I don't really like having windows obstructed by them. Plus, they don't blend well with old house decor really. But then again, maybe they do in a way...

Adding to the awkwardness of the task is the fact that we have new (not better!) vinyl windows that are not as sturdy as wood windows. For example, we don't really want to drill holes in the vinyl. Nor do we want the weight of a larger a/c resting on mere vinyl.

We've also found that the companies that sell air conditioners do not really address these issues. It's pretty much up to the homeowner to figure it out. And perhaps that's why you see huge units hanging precariously overhead propped up by a few bricks or boards.

After grappling with this issue for the past few years, we have finally found a solution that is less unsightly and also very secure, which is an issue living on the first floor.

This is one of those mundane tasks that we old house people face. It's one of those things I would think of no interest, but then a commenter asked to see our system and yet again, I realize that these are the types of solutions worth sharing.

First: Steve glued up boards to make the proper thickness, 1/4" above the vinyl window frame. This piece will be on the inside window sill supporting the a/c.

Note: Air conditioners should lean outward so that any condensation drips outside and not on your inside sill.


Here are the boards for each window glued up and ready to be cut to size with the table saw.

Next we removed the window stops.

Here you see the stained ledge in place after being cut to size without the window stop.

And with the trimmed windows stops and firmly in place. As Steve said, "This ain't goin' nowhere!"

The larger air conditioner is screwed into the board making it very secure and stable. We will probably add angle irons for further security.

The a/c unit does not touch the vinyl.

As you can see it's a pretty clean look. I just dislike looking at 2x4s on my window sill or books piled up or whatever.

This is a solution we can live with and best of all, it's permanent. All we have to is pop the a/c in or out as the seasons pass. Like us, the support ledge is there to stay.

Happy Summer!

Monday, June 04, 2007

These things take time

As you well know, a project done right takes way longer than the latter. If we just slapped some paint on our front door and called it a day, we'd have been done weeks ago. Instead, we are doing a "This Old House" quality repair and it's taking a bit longer.

At left you can see the trim has been primed and painted with two coats of Sherwin Williams oil-based Bunglehouse Blue. We reserve the option to add a third coat. On Saturday I scraped all the excess paint off the glass and cleaned the windows. I like the new color.


Also, on Saturday I tackled repairing the buckling veneer on the front door. I used a razor knife and cut out the failing and rotting areas and then using contact cement, glued 2-3 layers of oak veneer into place. Here you see everything clamped up to dry. I also sanded the door and filled any holes or dings with wood filler.

We decided to get a new unlacquered solid brass kickplate, which is going to run us about $82.00. This proving my theory that projects we undertake always go overbudget because we always seem to find a way to add something else. But it will look really nice, last virtually forever, and fit the door better.

I know I could go searching for the right one on ebay or salvage, but we have too many other projects to get going on so we are paying for convenience this time.

What did Steve do while I was working on the front door? Install a 18000 BTU air conditioner in our tenants apartment. He made a custom ledge out of oak stained to match the trimwork that raises the a/c above the vinyl window frame. It is a thing of beauty. No a/c eyesores in our building.

Incidentally, our tenants seem to be working out pretty well. On Saturday one of them told me how much she loves the apartment and how her friends are all jealous. They are quite sweet and considerate so far.

Monday, May 28, 2007

Time for Rejuvenation


And I'm not talking about light fixtures this time! This Memorial Weekend was just a little different from last year. If anyone recalls, last year we spent Memorial Weekend removing all the trim from the 2nd floor. Such began the story of the wood pile...


Steve and I went to Galena, which is a nice historic small town in Jo Davies County in Illinois. It's about a three hour drive from Chicago. Unlike most of Illinois, it's quite hilly and has lovely countryside.

We went canoeing, horseback riding, had massages, went antiquing and had some nice dinners out.

Of course, we had to check out the local architecture. Here is me in front of the oldest home in Galena. In Chicago, we have virtually no buildings this old because of the fire. Most of the homes were on the smaller size, but very charming nonetheless.


I really really love old ironwork.
Here you see the native and wild phlox, which was flowering everywhere and smelled beautiful. I wish I had taken photos of some of the gardens because there are some really great flower gardeners in Galena.

Unlike last year, we weren't working on the house, but I can assure you, we aren't going anywhere in that regard.

I'll be posting soon on the Front Door Re-Painting and the awnings.


Also, I keep noticing that the solid oak stairs to the basement have only one or two layers of paint on them. It is tempting me to relieve them of this brown paint. You know what they say about us strippers don't you? It's really hard to stop once you start on that road.

Saturday, May 19, 2007

As the grass grows...


The lawn is coming along nicely. I mowed it for the first time this season today as we had to give the grass a chance to take.

Its funny because Mojo insists on walking along the "path" where the conduit was buried last year. I think he likes the feel of baby grass under his delicate feet.

I've been remiss on blogging I know. I was in Las Vegas for a trade show for a week and that was fun. Las Vegas is such the opposite of everything I deal with in my every day life, I actually find it refreshing-funny.

I got some "me" time and saw a show, had a nice dinner, and went shopping, which I rarely do. I bought myself a pair of those $150 Seven jeans and it felt good!

I have been mainly working on my gardening. Here's a shot of the front parkway, which I plan to completely take over with plants eventually.

Steve's Mom planted our little pine tree a few yeas ago and we look forward to the day when it's 10' tall. We give it an inordinate amount of TLC, but there is something so cool about planting a little tree like that and having it grow into a big tree.

I'm sure you have experienced where you go back somewhere and see a tree that you remember and it's become a giant.

Plus, we love love love pine trees. Mark my words,we will be planting more evergreens before this season is over!


While we are on the subject of plants I adore, take a look at the utter perfection of this one- a lily of the valley. The fragrance, the perfect bell shape of the flower, the beautiful green foliage the toughness of this plant cannot be beat in my opinion. It does need to be controlled though as it can be invasive.


I saved mine from a teardown site in my neighborhood. They now line the fence along the sidewalk where they can't take over my yard, but soften the sidewalk.

Steve is going to put the 2nd coat of paint on the front door trim today. We still haven't worked on the door itself. I am holding off on photos for now. More on that soon...

Sunday, May 06, 2007

A Thorough Scraping


It's all about the prep work and we are not rushing our front door paint job this time. The better you prep, the longer the job will last. Also, the longer the job will take to complete. It's kind of a double-edged sword.

Saturday morning, Steve and I got to work scraping the loose paint off the front door trim We then filled any holes with wood epoxy and then sanded it all with 80 grit. Then we primed it with Sherwin Williams oil based primer. Stinky stuff oil paint. Then we prayed for no rain.

I like when Steve and I work side by side. Saturday morning I had the thought, "the couple that scrapes together stays together," and then I thought wryly, it's time for an intervention. Steve said our prep job was going to be "This Old House" quality. Uh-oh.


This morning when we reviewed our work, we decided that more sanding and filling was in order. Why not do it right?
I have to go out of town for a trade show in Las Vegas this week, so it will be up to Steve to keep this project going till I get back next Sunday.

Monday, April 30, 2007

Front Door Redux


Before our awning is installed, we'll be repainting the front door a more period appropriate color. Our home was built in 1910 and has some arts and crafts elements, so we are sticking with that color palate.

We have selected Sherwin Williams Bunglehouse Blue for the front door. The awning is a True Brown with a white key pattern trim. Our awnings will be shaped like this though, not rounded as in the previous link. We have delayed the awning for 2 weeks so we can thoroughly prep the door, repair some minor wood rot, and prime and paint it.

We have learned from experience that it pays to buy the best paint you can afford. Take our living room for example. We were not trying to be frugal. We just bought the paint brand they had at our local hardware store. Our living room is a deep red color and it took several coats to get full coverage. We ended up going back to buy additional paint, which cost more money anyway.

Another tip when painting is not to buy cheap rollers. We learned that painting the living room as well. We ended up with little pieces of fuzz all over the walls. Quite disheartening at the time. I never notice the flaws now, but our painting skills have much improved since that room was done about 5 years ago. My advice, buy the best rollers you can afford unless you like bits of fuzz everywhere.

Just some little lessons we've learned along the way.

Sunday, April 29, 2007

Serenity Now!


I have vowed this year that I will relax in my backyard. I will not work all summer every weekend on wood. I will invite some people over to enjoy the somewhat nice backyard. In the city, many don't have a backyard and so those that do should share sometimes.

We need to repair the concrete (see photo) to make this space more usable and that will happen within a month I'd say. In the meantime, I am going about my plantings and am awaiting the grass seed to take.


I've gone with yellow this year in the pots and some texture: ferns, vine, white marigolds for their hardiness, and one yellow flower whose name escapes me.


In front, I planted some forget me nots, Prince William phlox in a beautiful purple, some coleus for color in the shade and some rosemary. The garden has been somewhat delayed this year because of late frost, but things seem to be growing well now. I think some bulbs decided to wait until next year, but that's the way it goes. If it was the same every year, it would be dull I suspect.


Who doesn't love a mourning dove in the morning? I saw a titmouse too this morning.

Saturday, April 28, 2007

What is a Dutchman?


A dutchman is the perfect solution for repairing old wood and mistakes (we all make those right?) A few years ago, we were installing our swinging door and Steve mortised out the wood to fit these special hinges. Unfortunately, due to fatigue, he mortised one of them upside down. doh.

At that point, we decided we did not want to wait any longer for our swinging door, so we installed the door with the hinges surface mounted temporarily (for 2 years) and not mortised in.

Last weekend, Steve mortised the correct placement and today we were able to install the door catch as the door has a spring swinging mechanism and will stay closed unless propped open.


In these photos,you can see the Dutchmen with the hinges now correctly mortised in. We will of course, be staining them to match.


Here's the hardware from Crown City that hooks the door open. Pardon the dust. Solid brass and about $50.00. I used to gasp when Steve would tell me he spent $18 on a brass door stop, but now I don't bat an eyelash. Solid brass costs but is lasts.


It's nice to tie up loose ends. Last summer, we had no time for anything like this.

Coming up on the horizon for us work-wise:
Awnings to be installed
Concrete patio repair
Repainting front door
Pantry Shelving

Saturday, April 21, 2007

Win some lose some


As I've mentioned here, I've been off houseblogs the past month so I could help out with our local Aldermanic election. Unfortunately, my candidate lost, but we made a really great effort. Considering the fact that we had much less money, and resources, we lost by only 247 votes.

On election day, I was up at 4:30am and at the campaign office at 5am. I got to the precinct at 6am and didn't get home till almost midnight. Much of the day was spent outside in front of the polling place and trying to get out the vote. It was fun, but very draining.


This weekend, Steve and I got back to some house projects. I worked on some major lawn repair and Steve was taking care of some inside jobs. He installed the last of the shoe molding in our kitchen and fabricated and installed missing thresholds from our bedroom and dining room. Then, he started on patching our old booboo with the swinging door, so we can finally finish that project. We purchased special hardware that will hold the door open and have not been able to install it because of the mistake. Instead, we've had a box of bricks holding the door open.

It's so nice when these little tasks get crossed off the list. That is the plan for this summer- lots of smaller jobs. We have plenty of those!

Sunday, April 01, 2007

Making an entrance

We've been slowly working on our curb appeal for a few years. Little by little... giving our entry a makeover, restoring the french doors to the 2nd floor, and adding a decorative railing, landscaping the yard, etc...

We're down to the last bit of work we have planned for the facade of the building and that is adding awnings. We ordered our awnings yesterday from Chesterfield Awnings. They had been out a year earlier to quote the job ad now we are finally ready. The awning will be installed in about 6 weeks. We are putting a small one over the patio doors and a large one over the entrance.

I am excited to see this last change come to fruition. Other than that, my main "curb appeal" goal for this year is to add some more evergreen foliage to the front yard.

We also took a trip to Home Depot today and are ordering a new door for our garage. The door had to be special ordered so it will be here in about 3 weeks. It's nice because it will only need to be shimmed and we can eliminate the framing around the door that is currently there and kind of oddly done.

I'm glad that we are gettng going on some projects but nothing can compare to last year though. Looking back now, I realize how intense and exciting it was. I can actually kind of see how people can get hooked on renovation because one really feels like you are accomplishing something of significance. I have to adjust because we can't afford to keep that pace of spending money or working. I do miss it though sometimes. Such is the life of a renovator.